A
Anonymous
Guest
I posted a few of these pics in another thread as answers to a question about building a tank. Wanted to start my own thread for this project. So, here goes.
I am currently setting up two systems to replace the ones I lost this past hurricane season. I am seriously upgrading both. The 75 is being replaced with a 140 and the old nano with this one. The 140 project has hit a snag because of wait time for some custom made parts that I am waiting on. So, while the creative juices are flowing and the fact that I am ready for a reef to be up and running in my house after a six month absence, this little system has started to evolve.
This is like a nano on steroids. While I realize that it deviates some from the usual nano technique, I thought it would be fun to see if I could just downsize a regular system. I was inspired to do this by an article I read years ago where a reefer had an entire fish room (like those you see for 200-300 gallon systems) devoted to a 29 gallon tank. This won't be that extreme, but wanted a small tank with big tank features. Don't know how well it will work out, but it has been fun putting it together.
The tank is made from scratch of 1/4" plate glass. It will have no powerheads, pipe, heaters or any other equipment visible in the viewing area. Only a few bulkheads and a small overflow. The tank will be housed inside of a DIY cabinet to hide everything, except the front viewing pane of glass.
The tank will be lighted by a Coralife 96 watt fixture. It will have a sump and will incorporate a closed loop with a SCWD for better flow. The small sump will have a 1.5 gallon refugium with it's own Coralife 18 watt light fixture. Two Mag 3 pumps will be used. One for return from sump and the other will run the closed loop.
Since I am posting this in the DIY section, this thread will start at the beginning. So, here goes...
Prior to assembly, the tank walls were drilled for all of the bulkheads that will be needed for returns and closed loop.

1/2" bulkheads were installed and then the five glass panels were all siliconed together. Tank dimensions: 20"x9"x10" high.

I set the Coralife fixture on the tank for the pic. Perfect fit.

One of the configurations for the plumbing on the back of the tank. None of this is glued up yet and could change.

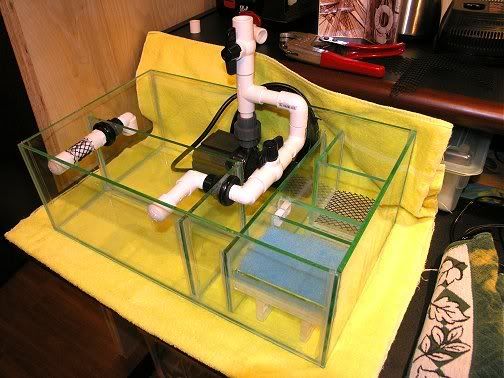
Then I started to put the sump together. Shown are the bubble tower, where water will enter the sump, the bubble trap and media tray for carbon, Pura pad, Polyfilter, etc.


Mini-bubble trap before it was installed.

Added refugium & plumbing. Dimension: 12"x5"x6" high.


I am currently setting up two systems to replace the ones I lost this past hurricane season. I am seriously upgrading both. The 75 is being replaced with a 140 and the old nano with this one. The 140 project has hit a snag because of wait time for some custom made parts that I am waiting on. So, while the creative juices are flowing and the fact that I am ready for a reef to be up and running in my house after a six month absence, this little system has started to evolve.
This is like a nano on steroids. While I realize that it deviates some from the usual nano technique, I thought it would be fun to see if I could just downsize a regular system. I was inspired to do this by an article I read years ago where a reefer had an entire fish room (like those you see for 200-300 gallon systems) devoted to a 29 gallon tank. This won't be that extreme, but wanted a small tank with big tank features. Don't know how well it will work out, but it has been fun putting it together.
The tank is made from scratch of 1/4" plate glass. It will have no powerheads, pipe, heaters or any other equipment visible in the viewing area. Only a few bulkheads and a small overflow. The tank will be housed inside of a DIY cabinet to hide everything, except the front viewing pane of glass.
The tank will be lighted by a Coralife 96 watt fixture. It will have a sump and will incorporate a closed loop with a SCWD for better flow. The small sump will have a 1.5 gallon refugium with it's own Coralife 18 watt light fixture. Two Mag 3 pumps will be used. One for return from sump and the other will run the closed loop.
Since I am posting this in the DIY section, this thread will start at the beginning. So, here goes...
Prior to assembly, the tank walls were drilled for all of the bulkheads that will be needed for returns and closed loop.

1/2" bulkheads were installed and then the five glass panels were all siliconed together. Tank dimensions: 20"x9"x10" high.

I set the Coralife fixture on the tank for the pic. Perfect fit.

One of the configurations for the plumbing on the back of the tank. None of this is glued up yet and could change.

Then I started to put the sump together. Shown are the bubble tower, where water will enter the sump, the bubble trap and media tray for carbon, Pura pad, Polyfilter, etc.


Mini-bubble trap before it was installed.

Added refugium & plumbing. Dimension: 12"x5"x6" high.


