Pirate's Reef

A

Anonymous

Guest
EDGRAY said:
:lol: :lol: you guys are so funny :lol3: :lol3: anyways pirtasreef i dont think your crazy ..you're just brilliant....nice setup... any more upgrade on the project. :???:
Well, I don't know about how "brilliant" I am. That's a stretch. Thanks though. I haven't had a chance to do anything else to the project this week. I have reached a point now where I will have to start building the cabinet for this thing. I have been back and forth on exactly how to build it. One thing I don't have is a nice workshop full of the right tools to use. As I have said, I am not much of a carpenter. So, this phase may go a little slower.

I am considering building the cabinet in 3 tiers: the bottom to house the sump, the center to house the tank itself and the top to house the light fixture and electronics. Each tier would sit on top of each other and the seam would be covered by a 1"x2" molding. This way, I could take it all apart for easy servicing or repair. It's not going to be little - but not as big as a full size aquarium and stand. Right now, the dimensions are looking like 28" wide and 36" to 40" tall. Bigger than most nano setups, I know. Some "nano purists" will not be happy. :bash:
 
A

Anonymous

Guest
skipm said:
Pirate, where would you go to find a glass drill like that one, I looked around some thia AM (had some extra time) and found nothing. Just curious is all, no more drilling than I do my Dremel and a diamond bit work fine.
Well, I got mine from a LFS that was closing down - about 15 years ago. Back then, I paid about $150 for it. I haven't really shopped around for one, but you should be able to find something on line. I did a quick search and found this one. It is similar to mine, but looks a little nicer. You would have to call them for a price. My guess is they probably sell for somewhere in the $400 - $500 range, based on what the LFS paid for this one years ago. Might be less, might be more.

http://www.crlaurence.com/ProductPages/4/41_11852.html?Origin=#MoreDetails
 

Dickie52

New Member
skipm said:
Pirate, where would you go to find a glass drill like that one, I looked around some thia AM (had some extra time) and found nothing. Just curious is all, no more drilling than I do my Dremel and a diamond bit work fine.
Skip,
I think I have found the one for you....


skipm

Moderator
Staff member
Thanks for the link Dickie but I was looking for something a little more automated, you know less hands on. Besides I would need one that is a production model :mrgreen: .
I actually came acrossed a few like this when I was looking but none of the smaller ones like Pirate linked. I guess its good I was only curious and not really in the market.
 
A

Anonymous

Guest
sadielynn said:
Pirate are your edges finished on the glass or just one side finished to take the sharpness down :?:
Just take a piece of sandpaper and lightly sand the sharp edges. It won't take much effort and the edges will be nice and smooth.

So, you are in the building mode?
 

sadielynn

New Member
I am gonna try one for hubby and it is small enough for me to tackle
will it hurt it if all four sides are sanded ? The glass shop will finish the edges for me for a small fee .....it will be a 1 gallon tank
 

skipm

Moderator
Staff member
I had the glass shop dress all of my edges when I ordered my glass, I had thought about just getting them to do the exposed edges to make it a little cheaper but figured I would blow their mind only getting certain edges dressed. I also thought with my luck I would cut myself on the unfinished edges.
 
A

Anonymous

Guest
Just an update....

Ok, here is where the project takes a bizarre turn. Tell me if I am crazy...

In addition to the 75 gallon reef lost to Rita, there was also a 45 that I had back in my home office. Well, the plans for "Re-Reefing" did not include setting this system back up. Only the upgrade to the 140 and a small nano-tank. Well, since I now have this home-made nano that needs a stand or cabinet to sit on, I decided to use the bottom of the 45 gallon stand.

So, I am going to put a top on the bottom of the home-made 45 gallon stand and turn it into a cabinet on which the new nano will sit. I have already cleaned up the old stand and repainted most of the interior. Meet my new "fish room." :)


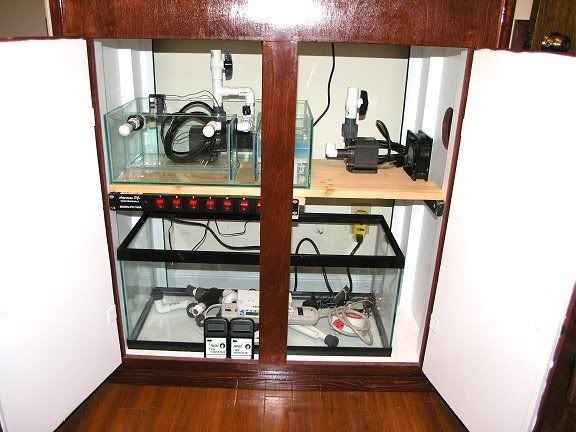
I installed a shelf for the mini-sump to sit on and put a 20 gallon long aquarium on the bottom. I am going to silicone a divider in the center of the 20 and it will become a top off reservoir to house 10 gallons of RO/DI water on one side and 10 gallons of fresh salt water for water changes on the other.

I also have some equipment left over from the 75 that I had no use for, so I am going to try to incorporate some of it in the new nano set up. I actually have two EuroReef skimmers that I cannot use on the 140, so if I can figure out how to work one of them into the design, I may install it to run on a timer. The skimmer is a little too tall though to work with the shelf that high. Working on another design for the layout.

So, am I nuts? :hwall:
 
A

Anonymous

Guest
skipm said:
I had the glass shop dress all of my edges when I ordered my glass, I had thought about just getting them to do the exposed edges to make it a little cheaper but figured I would blow their mind only getting certain edges dressed. I also thought with my luck I would cut myself on the unfinished edges.
Next time save yourself the "additional charge" and just run some sandpaper over the edges. It is very simple to do and requires very little effort. It is actually amazing how easy the sharp edges can be sanded down. Be careful handling the freshly cut glass though.
 

skipm

Moderator
Staff member
Thats one of the main reasons I had them polish the edges, I have been cut by freshly cut glas before and just wanted to avoid the hassle. I did think about doing it myself but decided to just pay for it. I have polished the edges before with my beltsander.
 

Jordan8008

New Member
Thats coming along really nice, I dont think your nuts for using the skimmers and any other equipment, u have them and arnt using them on other setups, better to use it then have it collect dust, I would just never go out and buy somthing like that for a nano....lol......very nice
 

TimSchmidt

New Member
Nah you're not nuts, just resourceful. I love the 20g turned water resevoir idea, just might "borrow" it myself :langle

Setup looks great, I just love it when a plan comes together and you see all the pieces coming together.

Tim
 
A

Anonymous

Guest
Jordan8008 said:
Thats coming along really nice, I dont think your nuts for using the skimmers and any other equipment, u have them and arnt using them on other setups, better to use it then have it collect dust, I would just never go out and buy somthing like that for a nano....lol......very nice
I pretty much just wanted to find a use for this old stuff that is still perfectly good. It's stuff that just got replaced by an updated sump / skimmer on the 140 (and a controller). Didn't really want to start up another good size tank - in the event we lose power again. I doubt I will be able to work in the EuroReef, because of space and the elevation of the mini-sump. Still tossing it around though. I think it would look cool to have that big honkin skimmer on a little system. Couldn't run it all the time though. Don't want to overskim it. I would put it on a timer - if I can figure out how to get it in there.


TimSchmidt said:
Nah you're not nuts, just resourceful. I love the 20g turned water resevoir idea, just might "borrow" it myself :langle

Setup looks great, I just love it when a plan comes together and you see all the pieces coming together.

Tim
There's another example of just wanting to finally find a use for something I already had. I had originally bought that to use as a refugium on the 75. I just didn't like the way it fit and ended up building a 30 gallon fuge. So, this 20 long has been laying around the house for a few years. I think it will work out fine for a reservoir. I thought about using it for the nano, but I wanted something smaller.

This project has actually cost me very little. About $40 for glass and the light fixtures (which I think were a bargain for $89 & $29 for the fuge light). I had everything else. I will have to buy a little bit more wood to build the enclosure for the tank and the top to the 45 stand. I have more ideas than time these days... :)
 
A

Anonymous

Guest
You will notice that most of the previous pictures are now missing from this thread. I was using "ReefBucket.com" to host the pics and something happened to that site today and all of the accounts - and pictures were lost. So, anything I have posted for the last couple of weeks is gone. I still have the pics, but it would take me some time to go back and repair all the damage. I will try to do that in between projects.

Here are some new pics of stuff I was fooling with today. This layout is still subject to change. I have changed it a few times already.

My priorities are about to shift away from this project soon. LifeReef has finally finished my sump, refugium and skimmer for the 140! So, I need to get back on that project also. Working on two at a time now. :eek:)


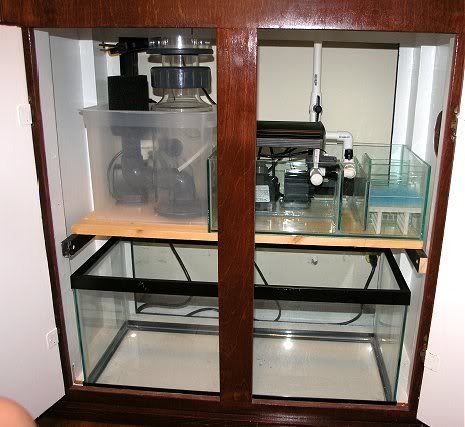
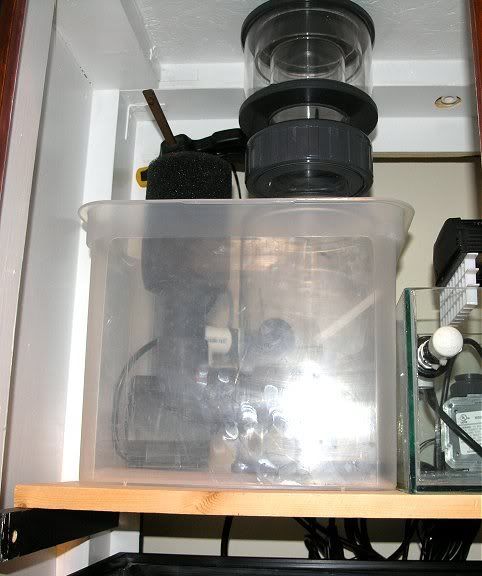
Open cabinet. Layout is coming together. I think I have managed to squeeze one of my idle EuroReef skimmers into the cabinet. It's sitting in it's own tub adjacent to the sump.


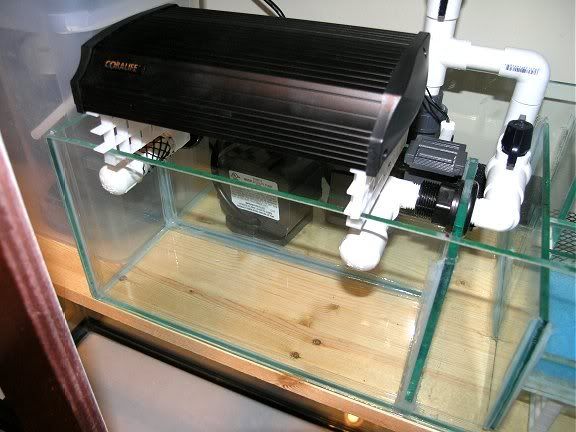
The min-fuge and lamp. That's a Coralife 18 watt fixture. Cute & pretty darn bright for $29.


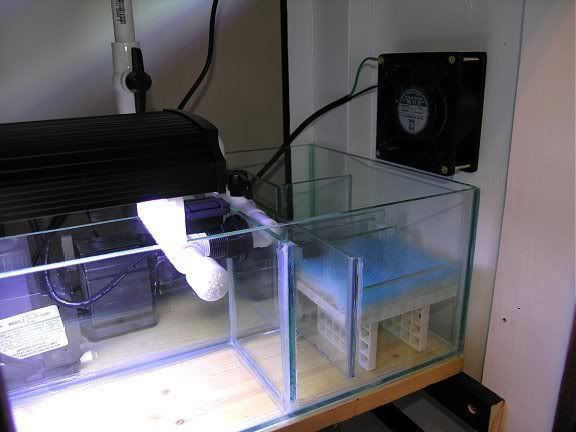
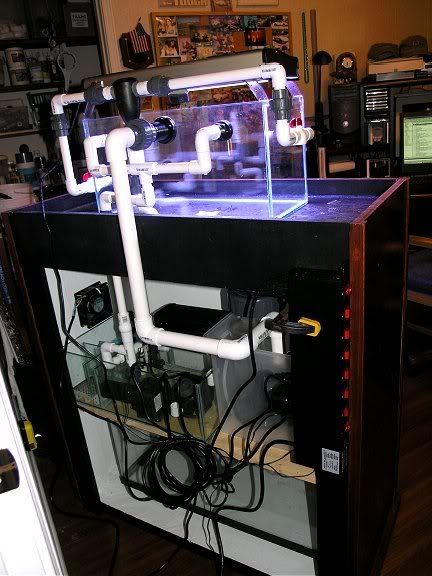
Shot of the mini-fuge and 4" fan installed on one side of sump. This fan puts out a lot of fresh air from outside of the cabinet and blows across the sump and the light fixture. A constant supply of fresh air inside of the cabinet.


The EuroReef in it's tub.


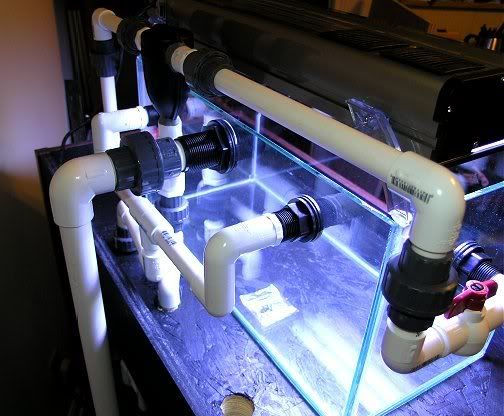
Almost finished with the plumbing layout. Still have to glue it all up and drill one more hole for the closed loop feed line. These wires will all be straightened out and done neatly - eventually. Also have to put the top on the stand. got the plywood for that today.


Another shot of the plumbing. A little tricky working all this around the tank. Remember, this will all be out of site once the enclosure is built for the tank.
 

Dickie52

New Member
What a great looking set up!!!

I know you must have said, but what size is that tank? It looks like an oddball to me..... :lol:
 
A

Anonymous

Guest
Oddball it is! Just like me! :) 7.8 gallons - homemade. 20x9x10 high.
 
A

Anonymous

Guest
Jennie said:
Wow, somehow I missed this thread! Interesting ideas that you've put to work.
Thanks! I went from having three tanks prior to the storm last summer - a 75, 45 and a 7 gallon, to only two new ones. A 140 and a homemade nano. I had a lot of equipment from the other tanks, because I had to buy new stuff for the 140 and did not set up any of the old tanks. You can't get a lot of money for used aquarium gear and a lot of this stuff was still in good condition. So, I decided to use what I could on the 140 project and more of it on the nano (even though it would be overdone).

What has evolved is kinda neat, although I know it isn't exactly what keeping a nano is all about. Just something I wanted to put together while I was waiting for some of my components I ordered for the 140. I have had a lot of fun putting it together and it's even more fun knowing that it really isn't costing me an arm & a leg to build a salt water tank. :)
 
Top