So I am working on a little project right now involving a 12g nanocube. I will be running 3 or 4 24 watt PCs in the cube and was looking into ballast options. I stumbled onto a couple articles on another site that discussed using the ballasts out of the screw-in compact fluorescent lamps like you can buy at any store suck as Wal-Mart, Home Depot, Lowes, Target, and thousands of other stores. It seemed too good to be true. Everybody who tried them and great success and they are usually only about $3-$6 a piece... a small fraction of the $20+ that a PC ballast normally sells for.
So.... I decided to try this project for myself. Now before I begin, I AM NOT RESPONSIBLE FOR ANY INJURIES INCURRED BY ATTEMPTING THIS PROJECT. IT INVOLVES GLASS, MERCURY VAPOR, ELECTRICITY, AND OTHER MATERIALS AND TOOLS THAT REQUIRE SKILL AND EXPERIENCE. ATTEMPT THIS PROJECT AT YOUR OWN RISK!!! :mrgreen:
First, start by figuring out the wattage of the lamps that you are going to be powering... these are usually 24 watts for a 12g nanocube. Then, find a screw-in PC lamp that has as close of a wattage as possible. So far, the closest I have found are 23 watts (this is the recommended wattage) and 26 watts (these will overdrive the lamp slightly). Home Depot sells a 4-pack of 23 watters for less than $10. MAKE SURE YOU ARE LOOKING AT THE ACTUAL WATTAGE OF THE LAMP AND NOT THE REPLACEMENT WATTAGE!
I personally went with the 26 watters because I always tend to overdue things! Again, I recommend the 23 watters.
Now the fun begins! :chainsaw:
Supposedly the base of these things will come apart if you use a screw driver and get it in the seam blah blah blah :blah .... Like I said, I always overdue things! So I busted out the dremel. Please be careful and use all appropriate safety equipment!
I began by making a couple cuts with a cut-off wheel...
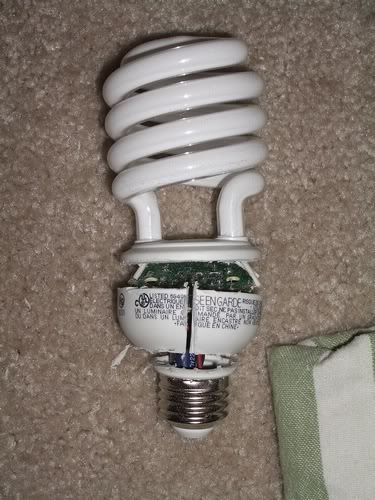
I cut all the way around the very top and bottom of the base, and then made the cut down the side in between the other two cuts to remove the midsection.
After doing so, this is what you find...

That is the ballast that you are trying to safely remove.
Now, there are 4 wires, 2 on either side, that run from the lamp to the ballast. You can see them on the far left and right of this picture...

They attach to the circuit board via these pins...
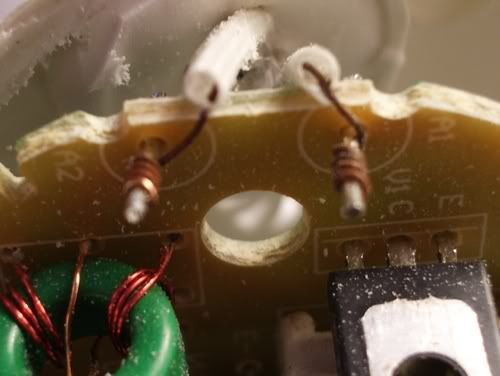
Gently unwind the wires from the pins and you have safely removed the lamp portion from the ballast...
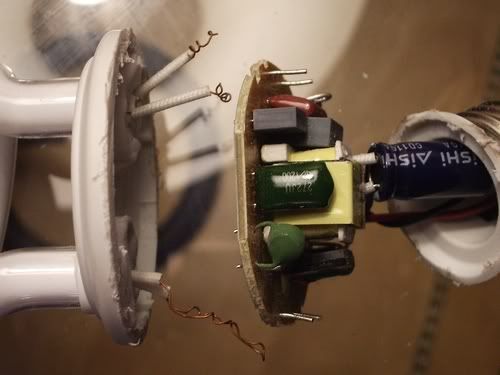
Next, there are two wires, one black and one white, that supply the power from the socket to the ballast...
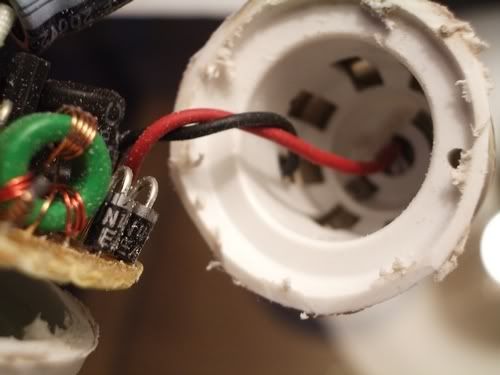
You can remove these by using a pair of needle-nose pliers and gently work the ends of the wires free of the socket.
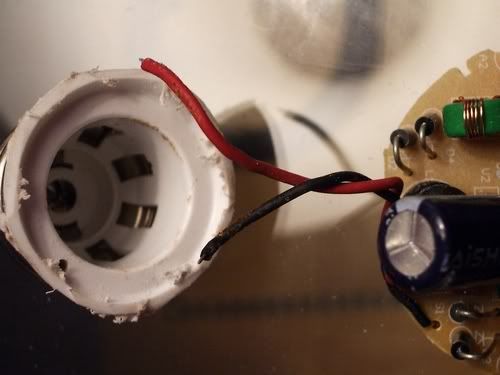
You have now safely removed the socket.
You should now be left with the bare ballast... something very similar to this...
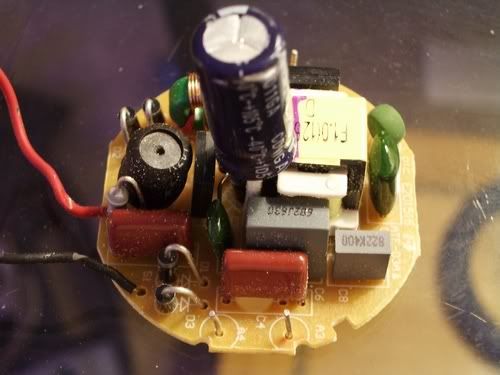
This is sort of where my picture documentation breaks down... sorry! :isorry
In the picture below, you can see where I attached a power cord (purchased separately) to the black and red wires... the two wires that were attached to the socket. I attached them to the power cord using twist wire connectors (the blue plastic pieces). When attaching the power cord, make sure that you match them up properly... the black wire on the ballast will attach to the power cord wire with the text printed on it. The other power cord wire that is free of text will attach to the red wire on the ballast.
You can also see where I soldered 4 wires... one to each of the posts that used to be attached to the lamp portion. Each post will have a mark printed on the circuit board (A1, A2, A3, A4). These signify which pin they will match up to on your power compact lamp. If you lay your PC lamp down, there should be text on one side of the base and no text on the other side of the base. Lay it down with the side of the base with the text facing UP and the pins pointing toward you. Now, the pins **SHOULD** be, from left to right, 1-2-3-4. So, match up A1 to the first pin, A2 to the second pin, etc etc.

Now, you are ready to plug it in and fire it up!
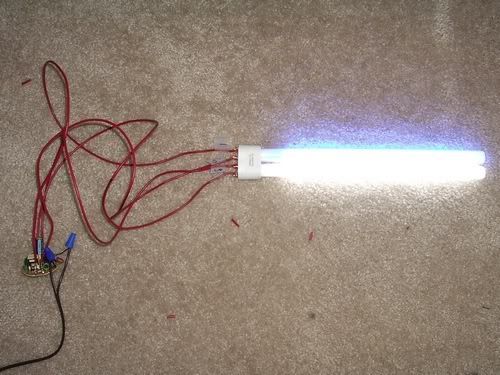
Be careful, there is an electrical current running across the back of the circuit board. These should be mounted to something that is non-conductive such as plastic or rubber.
These ballasts are great for a couple of reasons:
1. They are tiny!! the entire ballast measures only 2" in diameter.
2. They produce very little heat.
3. They are CHEAP!
I hope I covered everything, please ask any questions that you may have! And yes, I am considering doing these for others who don't want to do it on their own.
There are also 13 watter that will work perfectly for pico tanks or HOB refugiums, and 30 watters that will fire 28-32 watt PC's, and 40 watters that will fire sunpaqs.
Jesse
So.... I decided to try this project for myself. Now before I begin, I AM NOT RESPONSIBLE FOR ANY INJURIES INCURRED BY ATTEMPTING THIS PROJECT. IT INVOLVES GLASS, MERCURY VAPOR, ELECTRICITY, AND OTHER MATERIALS AND TOOLS THAT REQUIRE SKILL AND EXPERIENCE. ATTEMPT THIS PROJECT AT YOUR OWN RISK!!! :mrgreen:
First, start by figuring out the wattage of the lamps that you are going to be powering... these are usually 24 watts for a 12g nanocube. Then, find a screw-in PC lamp that has as close of a wattage as possible. So far, the closest I have found are 23 watts (this is the recommended wattage) and 26 watts (these will overdrive the lamp slightly). Home Depot sells a 4-pack of 23 watters for less than $10. MAKE SURE YOU ARE LOOKING AT THE ACTUAL WATTAGE OF THE LAMP AND NOT THE REPLACEMENT WATTAGE!
I personally went with the 26 watters because I always tend to overdue things! Again, I recommend the 23 watters.
Now the fun begins! :chainsaw:
Supposedly the base of these things will come apart if you use a screw driver and get it in the seam blah blah blah :blah .... Like I said, I always overdue things! So I busted out the dremel. Please be careful and use all appropriate safety equipment!
I began by making a couple cuts with a cut-off wheel...

I cut all the way around the very top and bottom of the base, and then made the cut down the side in between the other two cuts to remove the midsection.
After doing so, this is what you find...

That is the ballast that you are trying to safely remove.
Now, there are 4 wires, 2 on either side, that run from the lamp to the ballast. You can see them on the far left and right of this picture...

They attach to the circuit board via these pins...

Gently unwind the wires from the pins and you have safely removed the lamp portion from the ballast...

Next, there are two wires, one black and one white, that supply the power from the socket to the ballast...

You can remove these by using a pair of needle-nose pliers and gently work the ends of the wires free of the socket.

You have now safely removed the socket.
You should now be left with the bare ballast... something very similar to this...

This is sort of where my picture documentation breaks down... sorry! :isorry
In the picture below, you can see where I attached a power cord (purchased separately) to the black and red wires... the two wires that were attached to the socket. I attached them to the power cord using twist wire connectors (the blue plastic pieces). When attaching the power cord, make sure that you match them up properly... the black wire on the ballast will attach to the power cord wire with the text printed on it. The other power cord wire that is free of text will attach to the red wire on the ballast.
You can also see where I soldered 4 wires... one to each of the posts that used to be attached to the lamp portion. Each post will have a mark printed on the circuit board (A1, A2, A3, A4). These signify which pin they will match up to on your power compact lamp. If you lay your PC lamp down, there should be text on one side of the base and no text on the other side of the base. Lay it down with the side of the base with the text facing UP and the pins pointing toward you. Now, the pins **SHOULD** be, from left to right, 1-2-3-4. So, match up A1 to the first pin, A2 to the second pin, etc etc.

Now, you are ready to plug it in and fire it up!

Be careful, there is an electrical current running across the back of the circuit board. These should be mounted to something that is non-conductive such as plastic or rubber.
These ballasts are great for a couple of reasons:
1. They are tiny!! the entire ballast measures only 2" in diameter.
2. They produce very little heat.
3. They are CHEAP!
I hope I covered everything, please ask any questions that you may have! And yes, I am considering doing these for others who don't want to do it on their own.
There are also 13 watter that will work perfectly for pico tanks or HOB refugiums, and 30 watters that will fire 28-32 watt PC's, and 40 watters that will fire sunpaqs.
Jesse


